How To Draw an Airplane
Learn how to draw an airplane with this easy step-by-step guide. Perfect for beginners, kids, and anyone who loves drawing!
Equipment
- Pencil
Ingredients
Instructions
- Start by printing out the tutorial at the bottom of the post.

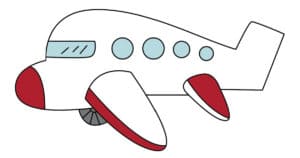
- Start by drawing a curved line for the top of the airplane and it slopes off towards the right.

- The second step is to draw the nose of the airplane. A small rounded nose and stop under the highest part of the airplane.

- The next step is to draw the main wing of the airplane. Draw a long U shape off the bottom of the plane and then add a small curved line connecting the sides of the U giving it its wing shape.

- Continue to draw the bottom of the plane back towards the tail wing. Add a smaller second wing towards the back of the airplane. Then for the tail, continue the top down the back of the airplane and then square off the tail of the aircraft.

- Draw a rectangle right above the airplane nose for the cockpit window. Draw small circles down from the cockpit window towards the back of the plane making them slightly smaller as you move backwards.

- The last step is to add the final details to the plane including small lines on the cockpit windows. Add a small wheel at the bottom of the plane right right where the bottom of the airplane and the wing.

- Once you have your jet airplane final drawing exactly how you want it, the final step is tracing over all your light lines with a sharp pencil and erasing any extra lines. Then outline the airplane with a black marker! Use markers, crayons, colored pencils, or acrylic paints, and turn your drawing lesson into an airplane coloring page! Different colors and bright colors make for a great drawing!