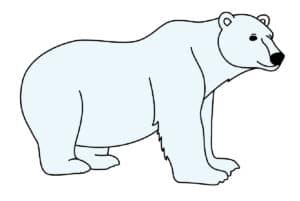
How To Draw a Polar Bear
Discover the magic of drawing a polar bear with our step-by-step guide. Unleash your creativity and bring these majestic creatures to life on paper!
Equipment
- Pencil
Ingredients
Instructions
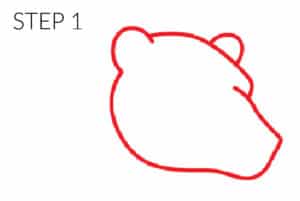
- Start with the polar bear's head. You can draw his head in an oval shape. Then add small ears to the top of the head. There is a small curved line right above the nose (or snout) this is an easy way to give the illusion that the polar bear is slightly turned towards the paper.
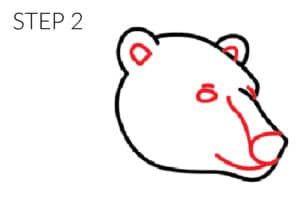
- The next step is to add the facial features of the polar bear. Draw two small curved lines inside each of the years. Then draw a circle at the tip of the stout and then a small line up from the nose towards the eyes. Draw one small circle for the eye along with a small line for the eyebrows and lastly a small line for the smile,
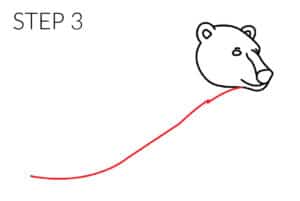
- Next, draw a slightly curved line diagonally down from the bottom of the face, and then curve slightly up at the belly.
- The next step is to draw the polar bear's back and hind legs. With any large size bear (polar bear or grizzly bear) they have a few bumps on their back. So if you are going for a more realistic polar bear drawing, then add a few bumps. If you are going for a more cartoon polar bear drawing, then a smooth curved line will be just fine. Once you get to the hind legs, curve down and then draw a flat paw.
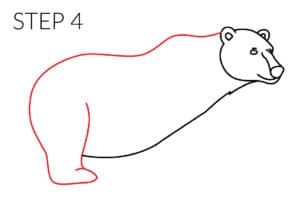
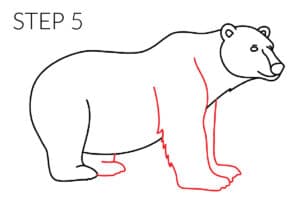
- Then add the other hind leg under the belly similar to the first hind leg. Draw the front legs between the belly and the bear's face. You can even add some fur details to the back of the front legs.
- Once you have your polar bear exactly how you want it, the final step is tracing over all your light lines with a sharp pencil and even outlining it all with a black marker!
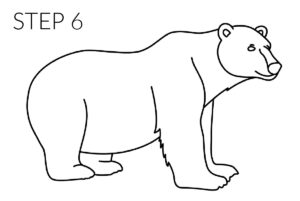
- The final step if you choose to is to use markers, crayons, colored pencils, or paints and turn your drawing lesson into a massive bear drawing! Different colors and bright colors make for a great drawing!