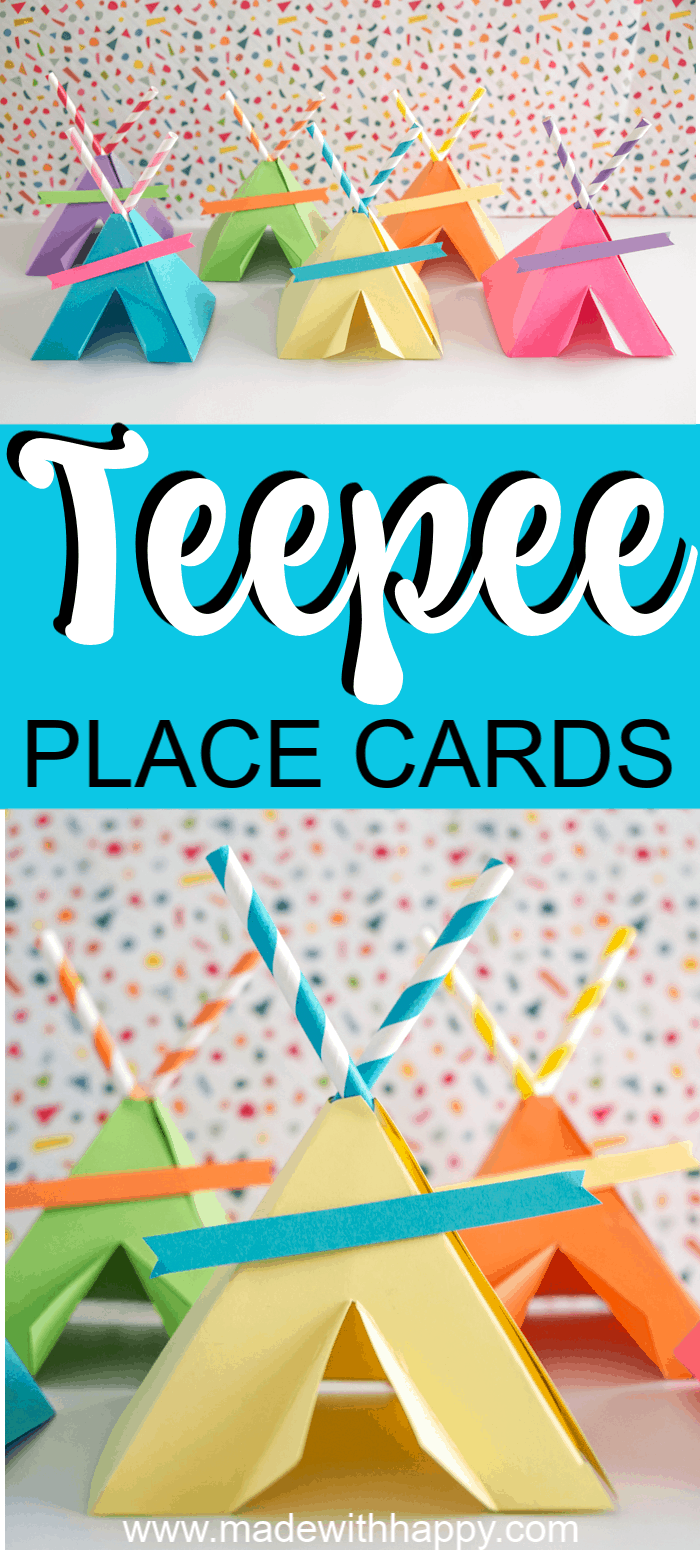
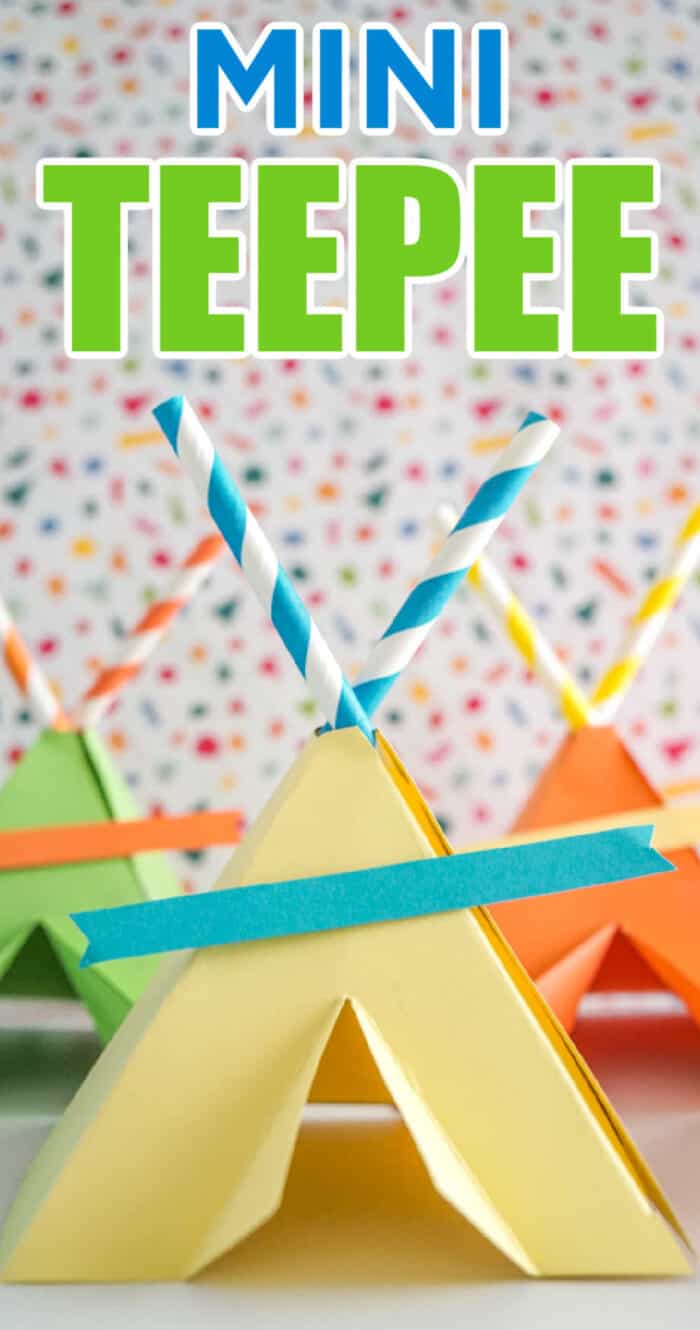
Looking to spruce up your Thanksgiving place setting, then these free teepee craft printable place cards are just the thing.

Want to save this project?
Enter your email below, and then we'll send it straight to your inbox. Plus get awesome new projects from us each week.
This teepee craft is a great addition to anyone looking for Thanksgiving crafts or crafts depicting Native American culture and American history.
We've put together free printable mini teepees as a fun November craft in hopes of better understanding the history of Thanksgiving and the integral part of the Native Americans in the first Thanksgiving.
Easy Thanksgiving Craft
You all know I love a beautifully decorated Thanksgiving table with all the beautiful napkins, place setting, and of course a fabulous name place card.
I was looking to create a fun printable place card when I decided we all needed some fun printable place cards. We've also created turkey crafts that are easy to craft and make great table decorations.
These three-dimensional paper teepee are a great addition to any Thanksgiving place setting. Only using simple supplies, our printable teepee templates on construction paper, and a few straws as the lodge poles, you can light up your Thanksgiving table.
Easy Teepee Craft Supplies
What I love about these fun name-place cards is that it does not take a ton of supplies. It's super easy to make and a really great kid's Thanksgiving craft.
It can coordinate with whatever colors you are decorating your Thanksgiving table. Also, it can be made into Thanksgiving decor as well in case you simply want them as part of your Thanksgiving tablescape.
This easy paper craft is so fun and can be made with any color scheme you are decorating with.

- Free teepee printable - Grab below
- Construction Paper or Card Stock
- Double-sided tape or glue
- Ruler
- Paper Straws
- Tape
- Pen
- Scissors
How to Make a Teepee Model

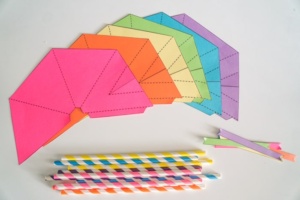
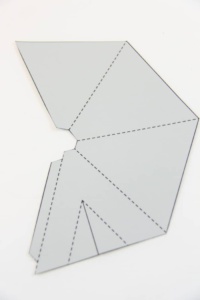
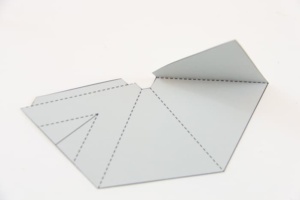
Print out your free teepee template. This is where you can coordinate with your table decor. We went with blue and orange a few years back and then of course went a little more colorful this time.
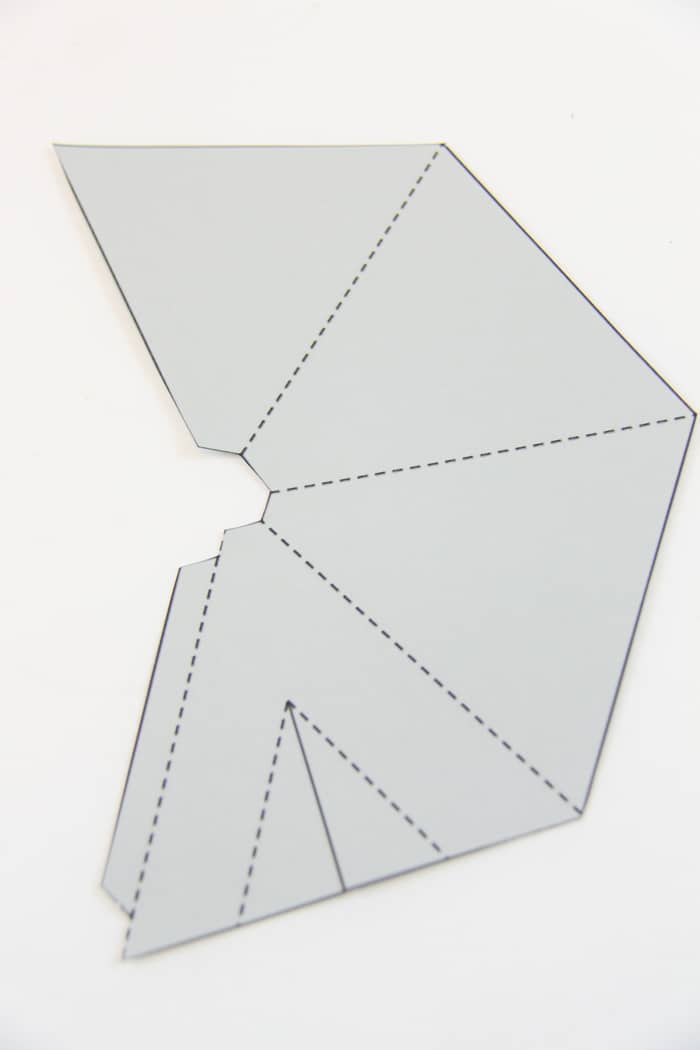
Cut along the solid black lines. If you are doing this with the kids, the younger kids may need a little help with this part.
My general rule is if they cannot cut somewhat of a straight line (like kinder and below) then I cut them for them and let them color and decorate the teepees. If they are able to cut, then they are in charge and working on their fine motor skills.

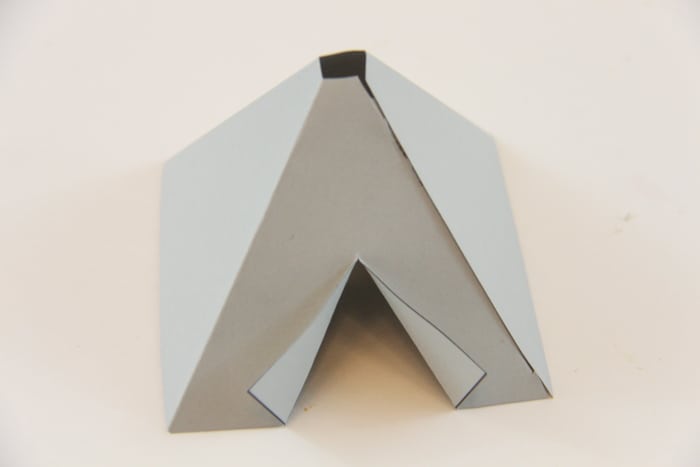
Fold along dotted lines. What I found to make this easier after the first one is that when you start to fold a single flap over, the bottoms match up.
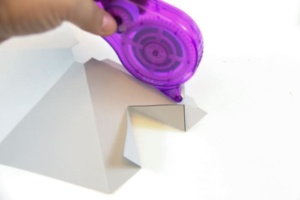
Taping Teepee Craft Together

Apply a strip of double-sided tape to the folded flap. This will connect the two sides of the teepee. In the case you only have single-side tape, you can simply tape the flap down like a present, or strip of glue.
That is what I like about this craft is that you use what you have and there are lots of different ways to get to the end results.
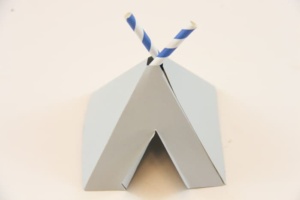
The straws in this craft are to be used as teepee poles. Cut straws to 5 inches each. This is just a general measurement for those who like precise lengths. If you would rather eyeball it, I would say it's ¾ths of a standard paper straw length.

Tape each straw to the inside of the teepee. What you'll find once you stick the straws through the hole at the top of the teepee, is that they really only fit with the straws taped to the side.

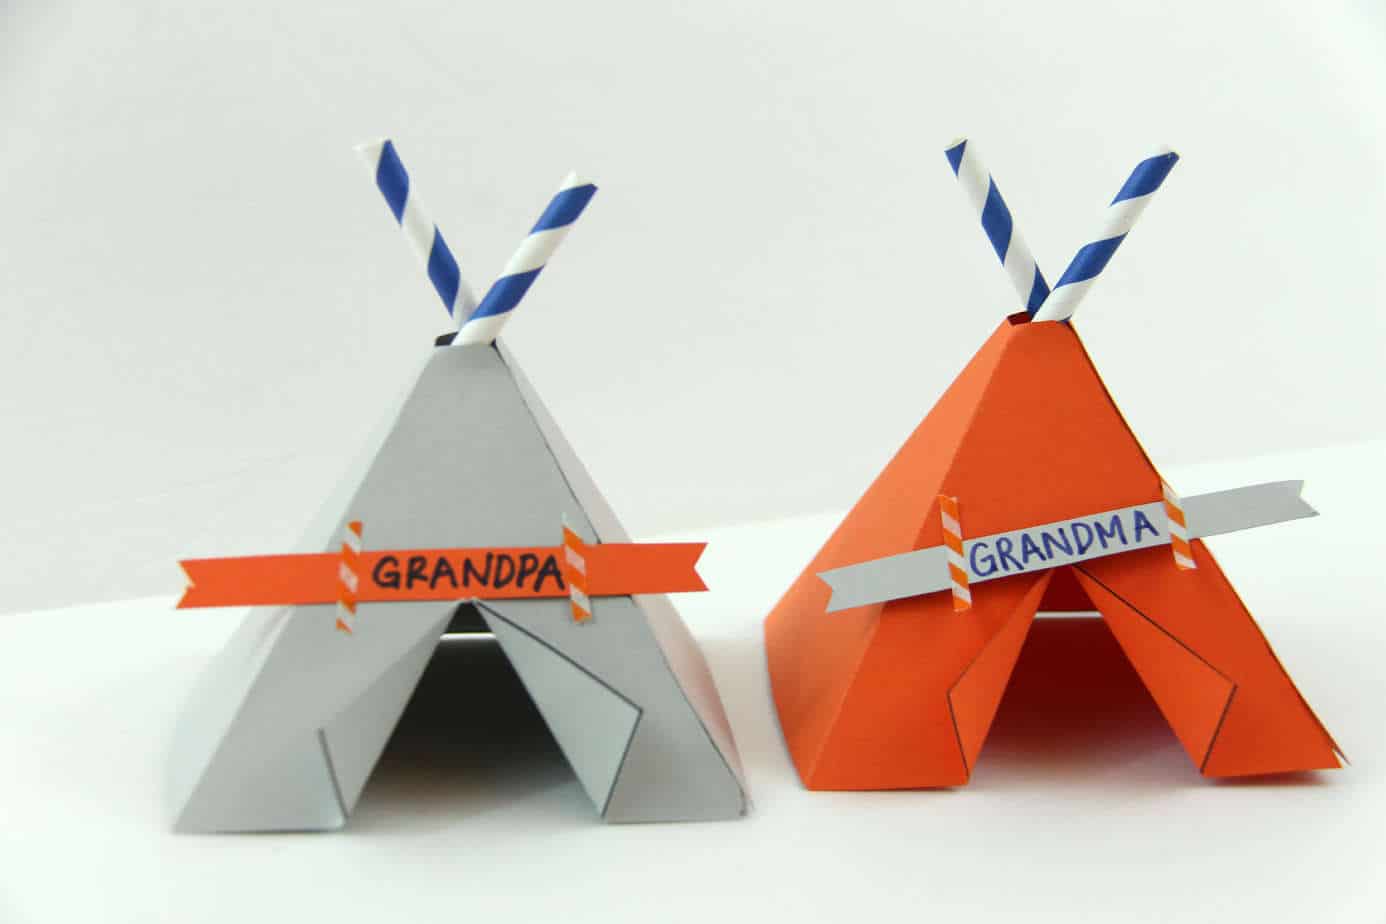
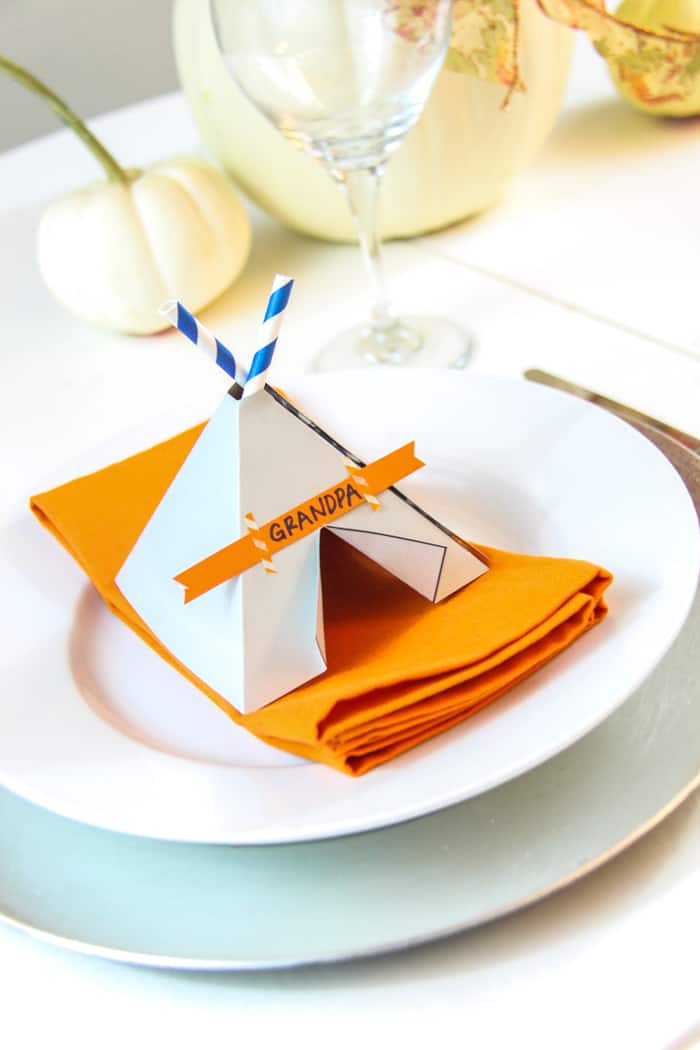
Cut out the banner, write your name on it, and tape it above the door of the teepee. Again, if you have decorative washi tape and want to take it that way, awesome.

If you have double-sided tape, then you can tape them to the teepee with that. I've also rolled a piece of wrapping paper tape up and attached it to the back and it worked like a charm.

Viola, this teepee craft is turned into a place setting.
Happy Crafting and Happy Thanksgiving!

Thanksgiving Table Setting Ideas
Be sure to check out the 101+ more printables for kids like this one.
We highlighted this Easy Fall kids craft along with some other fun kid's crafts in our November Crafts along with our 101+ Kids Crafts.
Other Thanksgiving Place Setting Ideas you might enjoy
- PRINTABLE THANKSGIVING PLACEMATS
- THANKSGIVING PLACE SETTINGS: HOLIDAY CANDLES
- CRANBERRY ROSEMARY CHRISTMAS NAPKIN RINGS
- PLAID THANKFUL PLACE CARDS (FREE PRINTABLE)
- PILGRIM HAT NAME PLACE CARDS
- THANKSGIVING TABLE SETTING - GIVE THANKS BANNER FREE PRINTABLE
Download Your Free Printable Teepee Templates
Enter your name and email in the form below and be directed to the printable teepee template pdf files. If you would rather not fill out the form, you can also purchase the printable from my shop teepee tent template.
*For personal use only

Get the Whole Thanksgiving Bundle!
Grab our exclusive Thanksgiving printable bundle in our shop, with this Thanksgiving craft, as well as 14 other printable Thanksgiving coloring pages, crafts, and games!
CONNECT WITH MADE WITH HAPPY!
Be sure to follow me on social media, so you never miss a post!
Facebook | Twitter | Youtube | Pinterest | Instagram
Find and shop my favorite products in my Amazon storefront here!

Teepee Craft - Free Printable Place Cards
Looking to spruce up your Thanksgiving place setting, then theses free teepee printable place cards are just the thing.
Equipment
Ingredients
- Free teepee printable - Grab below
- Colored Cardstock
- Double sided tape
- Ruler
- Paper Straws
- Tape
- Markers
Instructions
- Print out your free teepee printable thanksgiving place cards. This is where you can coordinate with your table decor. We went with blue and orange a few years back and then of course went a little more colorful this time.

- Cut along the solid black lines. If you are doing this with the kids, the smaller babes may need a little help with this part. My general rule is if they cannot cut somewhat of a straight line (like kinder and below) then I cut them for them and let them color and decorate the teepees. If they are able to cut, then they are in charge and working on their fine motor skills.

- Fold along dotted lines. What I found to make this easier after the first one is that when you start to fold a single flap over, the bottoms match up.
- Apply a strip of double sided tape to folded flap. This will connect the two sides of the teepee. In the case you only have single side tape, you can simply tape the flap down like a present, or tape in on the inside. That is what I like about this craft is that you use what you have and there are lots of different way to get to the end results.
- Cut straws to 5 inches each. This is just a general measurement for those that like precise lengths. If you would rather eye-ball it, I would say its ¾ths of a standard paper straw length.
- Tape each straw to the inside of the teepee. What you'll find once you stick the straws through the whole at the top of the teepee, that they really only fit with the straws taped to the side.
- Cut out banner, write name on it, and tape above door of teepee. Again, if you have decorative washi tape and want to take it that way, awesome.
- If you have double sided tape, then you can tape them to the teepee with that. I've also rolled a piece of wrapping paper tape up and attached it to the back and it worked like a charm.


Video
TEEPEE CRAFT
PIN IT TO YOUR DIY BOARD ON PINTEREST!
FOLLOW MADE WITH HAPPY ON PINTEREST FOR ALL THINGS HAPPY!