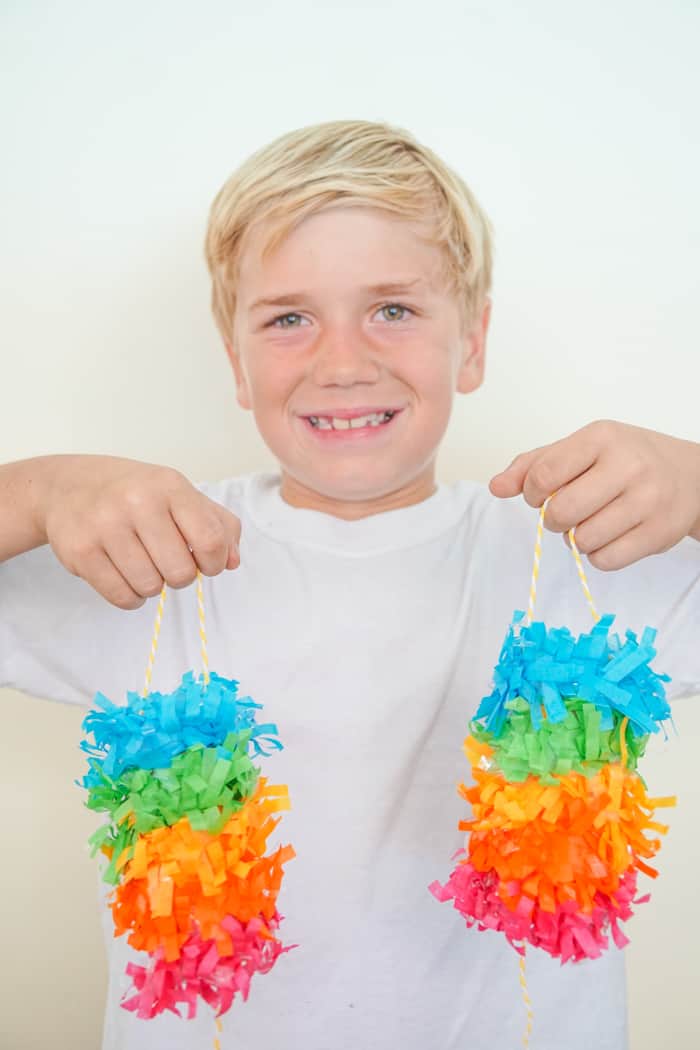
Looking for a fun kids birthday party craft, then we have you covered with these super easy mini piñatas. They make a great party favor too!
Want to save this project?
Enter your email below, and then we'll send it straight to your inbox. Plus get awesome new projects from us each week.
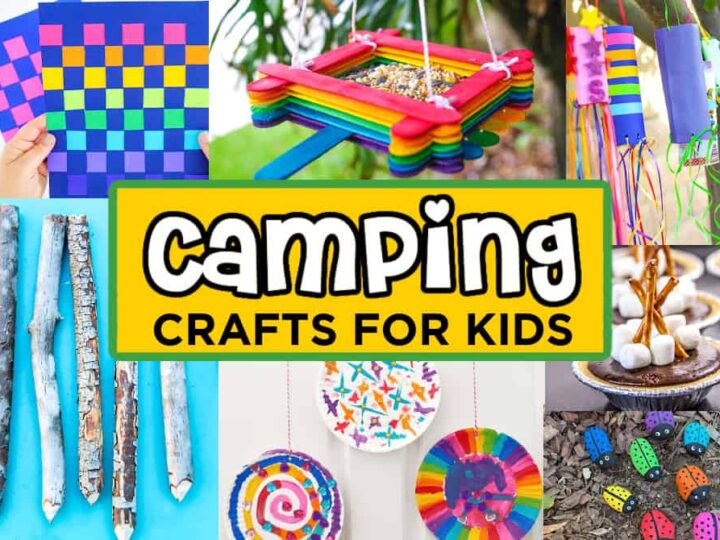
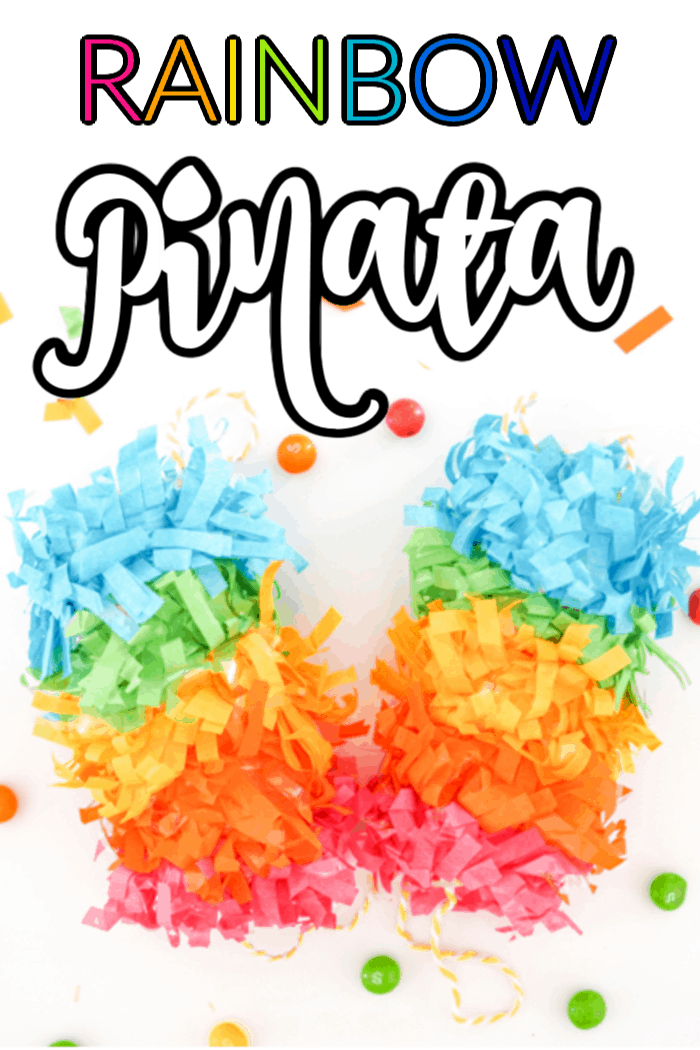
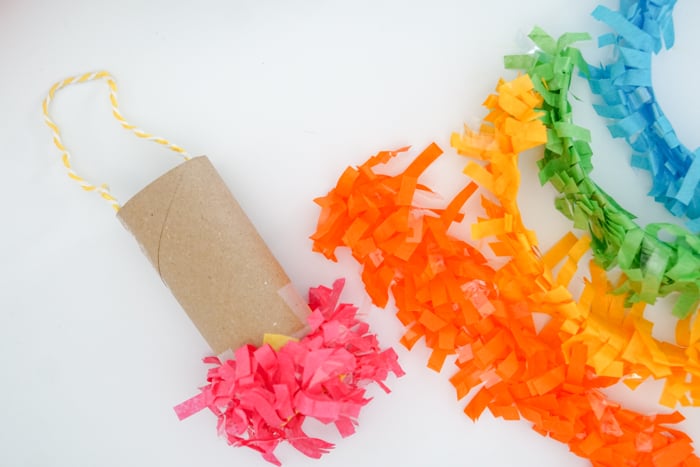
Sharing a fun easy tutorial for these easy rainbow mini piñatas that would be great as a party craft for a rainbow party, St. Patrick's Day party, or Cinco de Mayo party! Whatever the special occasion is, these toilet paper tube pinatas are all kinds of HAPPY and make for some colorful decoration.
If you love piñatas as much as we do, then you will not want to miss our other popular pinatas including Rainbow Punch Pinata, American Flag Punch Pinata, Individual Heart Pinata, DIY Pinata Planters, and DIY Punch Pinata Advent Calendar.
Don't miss our Rainbow Facts!
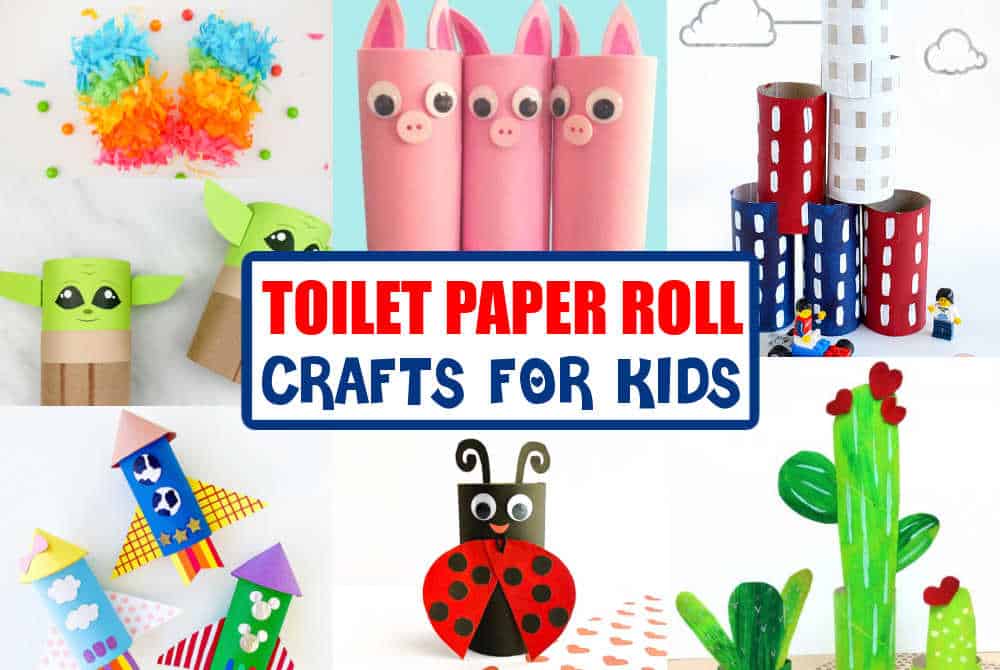
Toilet Paper Roll Crafts
I am always looking for fun toilet paper roll crafts for kids. I cannot be the only one that keeps the empty toilet paper rolls after their first use, right?
We have a round-up of fun crafts like this one in our toilet paper roll crafts round-up with other fun crafts like our binocular craft and ladybug craft. All kinds of fun and easy crafts for kids using those toilet paper rolls.
We highlighted this Cardboard Craft along with some other fun kid's crafts in our May Crafts for Kids along with our Easy Craft Ideas for kids.
What I love about mini pinatas
They can be used for many fun activities including:
- Great kid's craft - If you are looking for a fun toilet paper roll kids' craft, grab a few supplies and let them make them
- Fun kid's party crafts - These are so much fun for the kids to craft and make and easy enough to not require a ton of guidance.
- Party Favors - If you choose to have the kids make these sweet personalized pinatas at the party, then as a parting favor, you can put some candy or mini toys out for them to place inside them and take home! Two birds, one stone (crafts) 🙂
- Gift Card holders - If you are looking for a fun way to give a gift card, these are so fun to make and then place the card on the top.
- Classroom crafts - another great kids' party craft. If there is a classroom party and you need a craft to celebrate St. Patrick's Day, Cinco de Mayo, Birthdays, bachelorette party, or anything you are looking for fun party decorations. These are great fun for the kids.
Mini pinatas are one of my absolute favorites. Whether it's a Cinco de Mayo pinata, mini donkey pinata, mini unicorn pinata, or a fun mini pinata for birthday celebrations. They make the receiver feel sparkle and bash and all kinds of HAPPY. They double as fiestas decorations
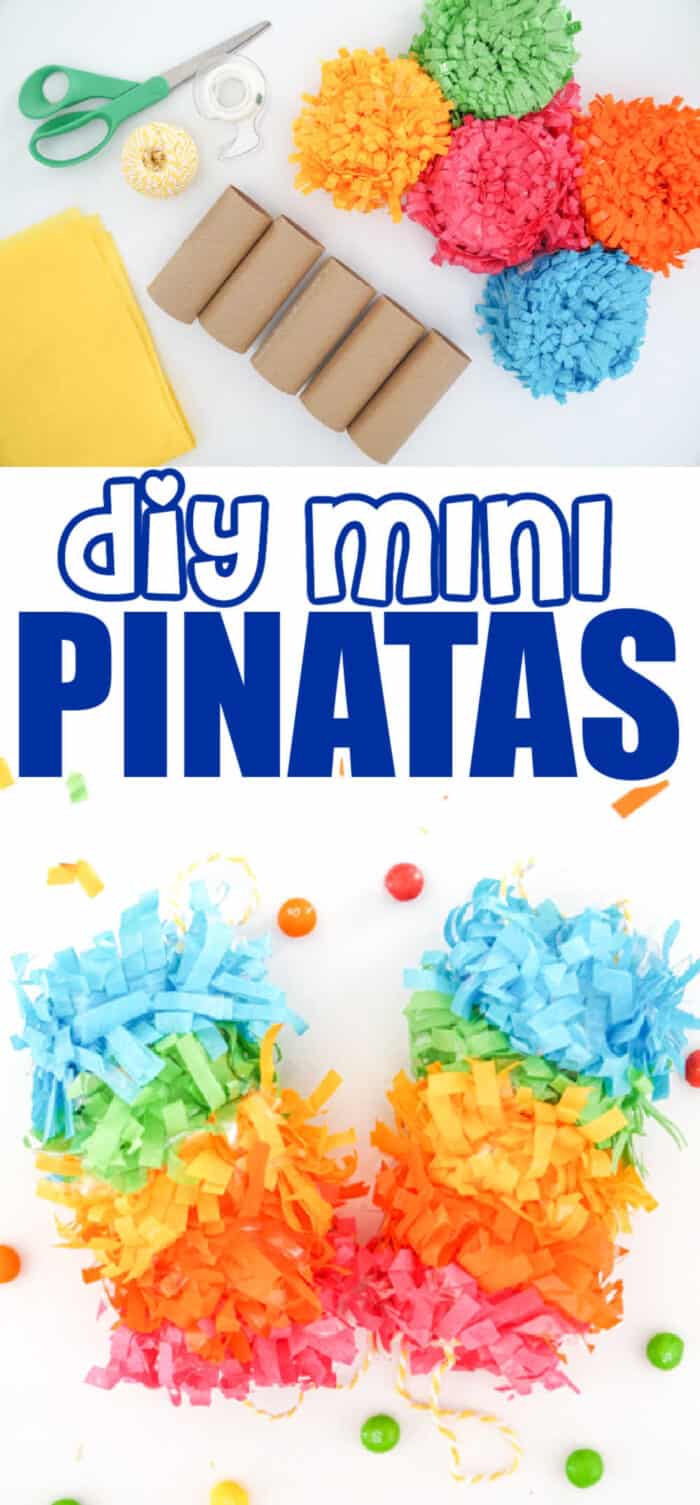
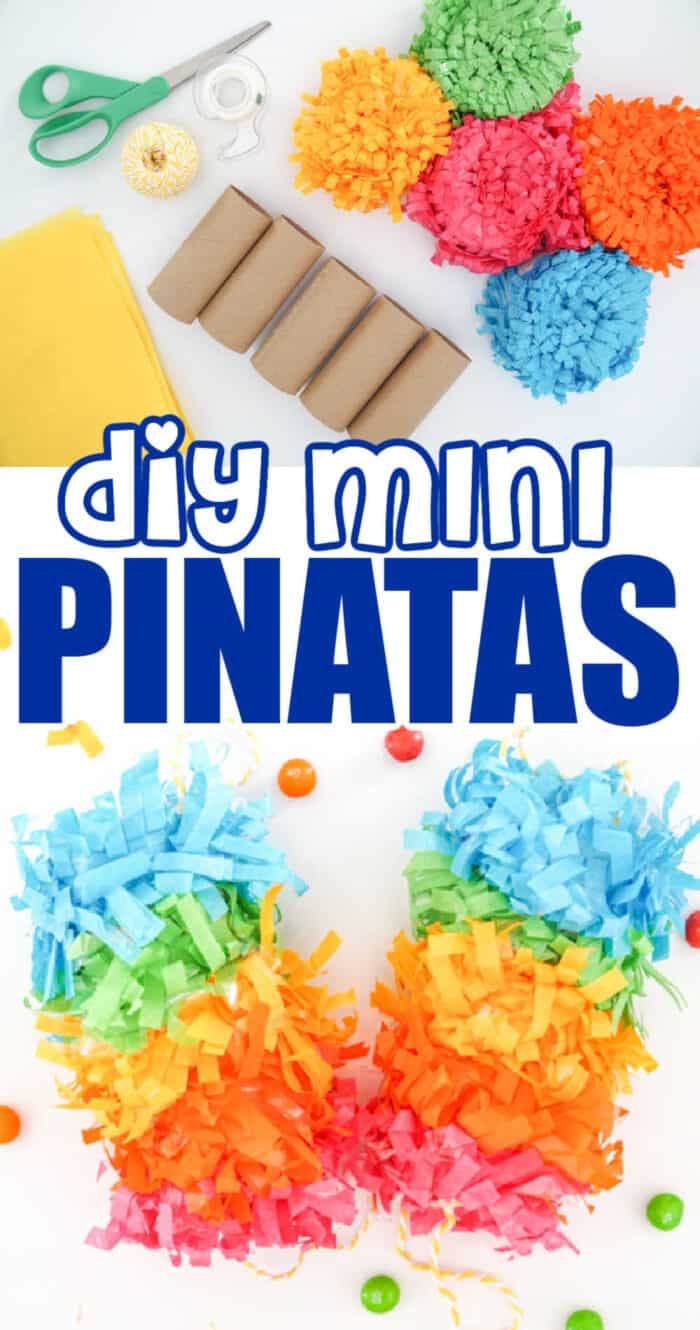
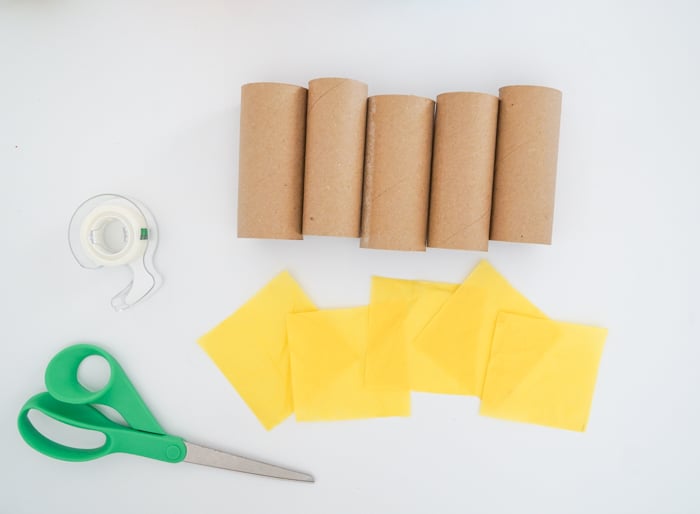
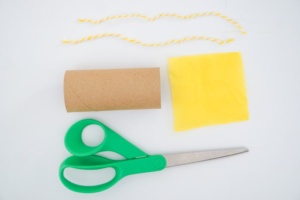
What you need to make these personalized pinatas
Using simple materials to create crafts is one of our favorite things.
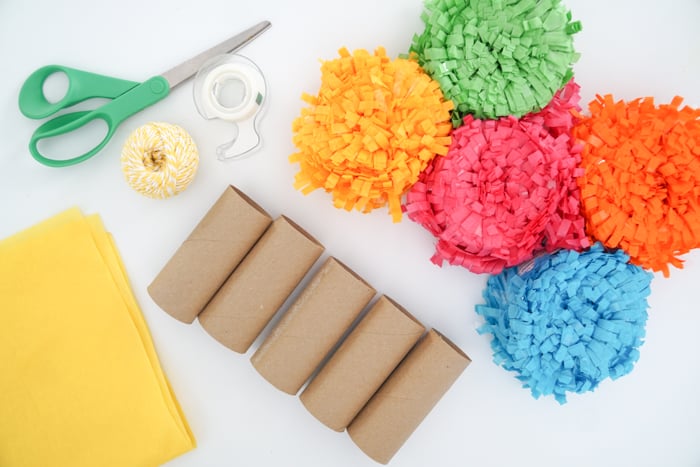
- Toilet paper rolls - if you do not save them, you can buy a group of 30 craft rolls
- Festive festooning - each color is sold separately. I love using it for lots of other kids' crafts and party supplies. You can use crepe paper too and simply cut one side to make a fringe.
- Tissue Paper - one sheet is plenty for most group sizes.
- String or Ribbon
- Tape
- Scissors
How to make these single-serving rainbow pinata
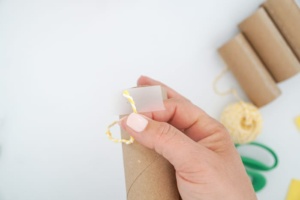
Adding the pinata handle
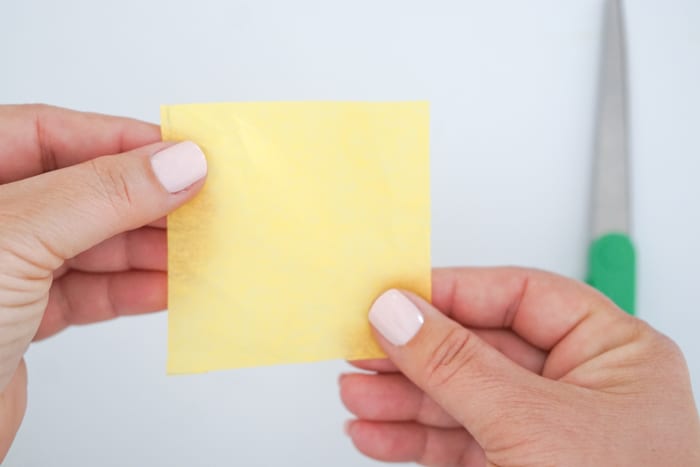
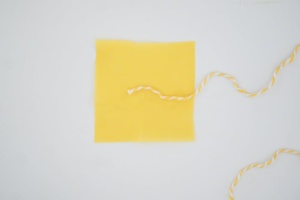
Start with cutting the tissue paper into 3-inch squares. This is a great size for a standard toilet paper roll. The key is to make sure that it covers one of the ends.

Cut the string or ribbon into 8-inch pieces. You can, of course, make these longer, but for the sake of efficiency if you are making them for a class or party then I suggest making them all 8 inches. You will need two pieces per pinata.

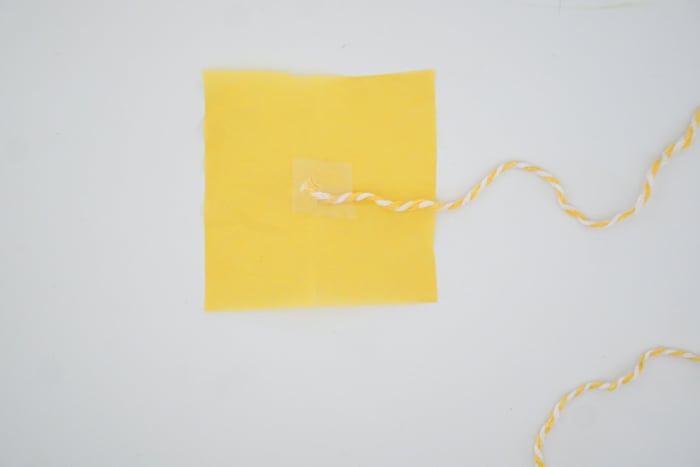
Place a small piece of tape on the end of one piece of the string.
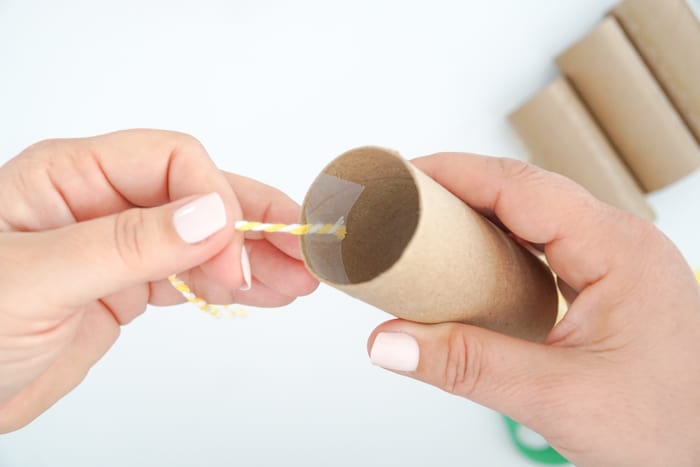
Tape the end of the string to the inside of the craft roll.
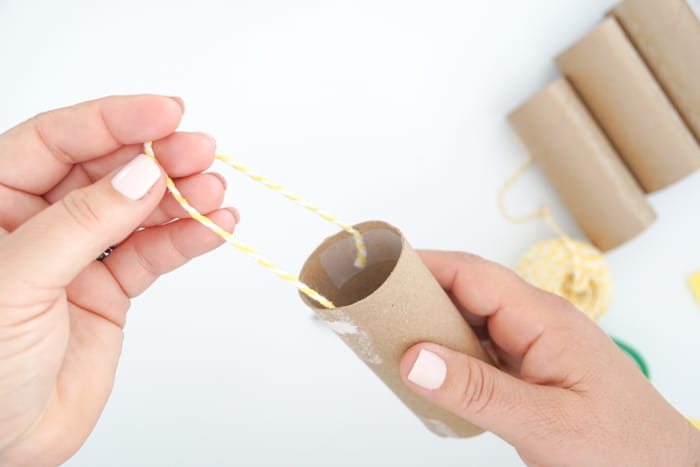
Tape the other end to the other side of the inside of the roll.
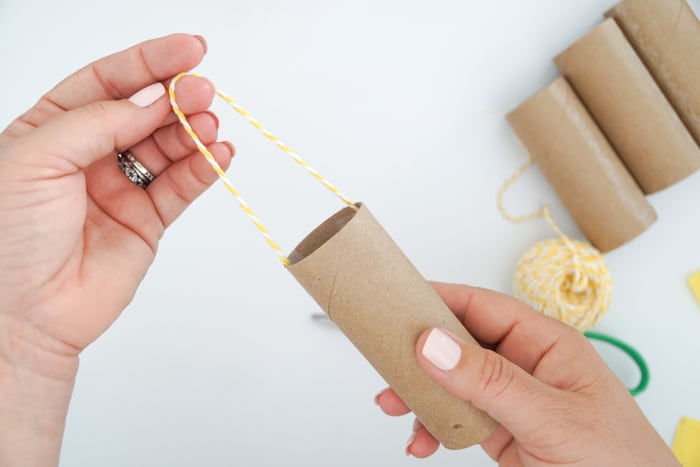
This creates the handle for the pinata. Note, if you are looking to add heavier items into your pinata like toys or heavier candy, and want these to hang. Punch a hole in the sides and tie the ends of the string in knots and then your mini pinata holds up to 2lb.
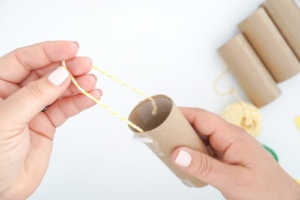
Create the trap door at the bottom of the pinata
Next, take your 3-inch tissue paper square and you are going to cut a small x in the middle. This will make it when the kids pull the string off the bottom to let the candy out.
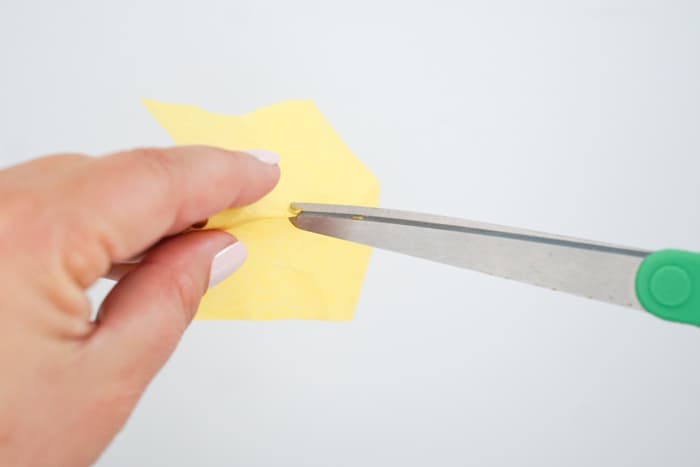
To cut an "x" you simply fold the square in half and make a small cut, then fold it in half the other way and make another cut.
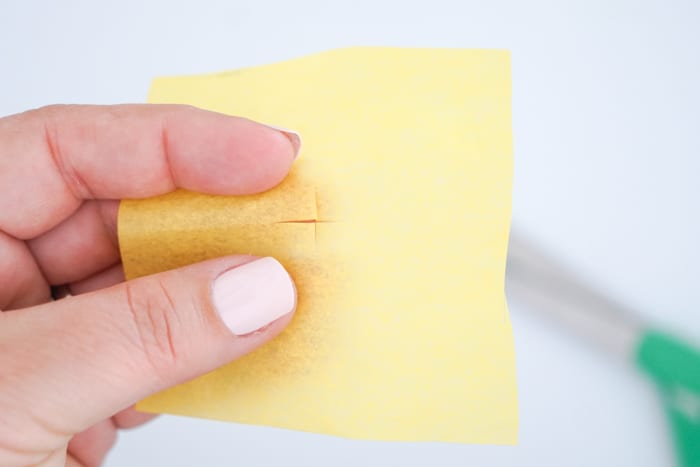
That will give your tissue paper a small x in the middle of your square. If the kids are younger and you do not want them handling scissors, simply cut the x on the tissue paper before you place out the craft. The goal is a small hole that will help when letting the goodies out of the pinata.
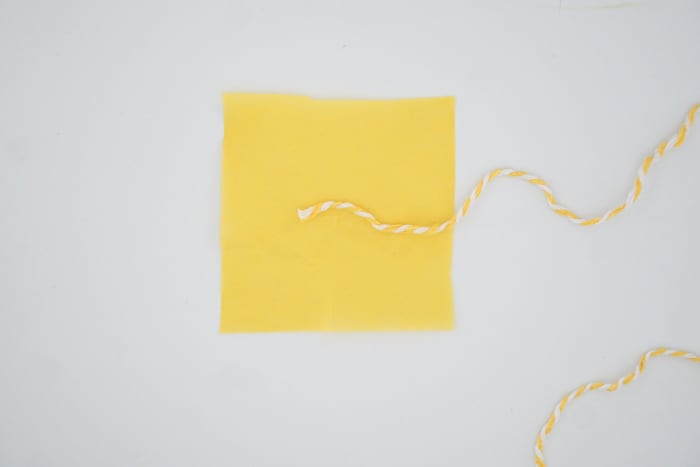
Take one end of a piece of string and place it over the x of the tissue paper.
Tape the end of the string to the x of the tissue paper. This will be the tail of your pinata.
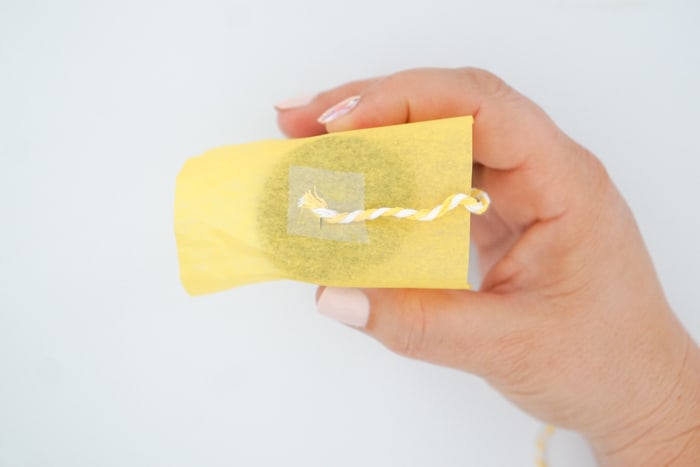
Place the tissue paper over the other end of the toilet paper roll. The handle is on one end and the tail end of the pinata is on the other. You will then tape the tissue paper around the outside of the craft roll. This then creates the trap door.
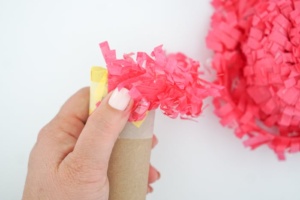
Adding color to your DIY Pinata

Now it's time to add the festooning to the pinata. You will start at the bottom of the pinata.
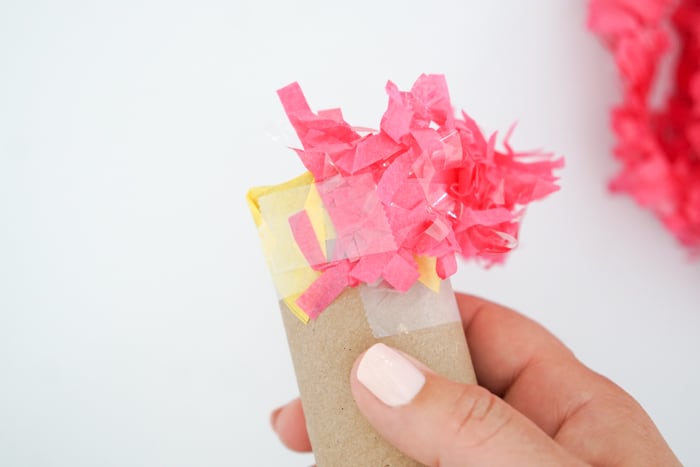
What I love about the festooning is that the middle is a solid ribbon that is easy to tape. You can cut your festooning into 6-8-inch pieces depending on your craft roll.
*Note: IF you are using crepe paper or strips of tissue paper, you would tape those to the tube in the same fashion.
Tape the other end of the festooning. The fringe covers the tape so you can not even see it.
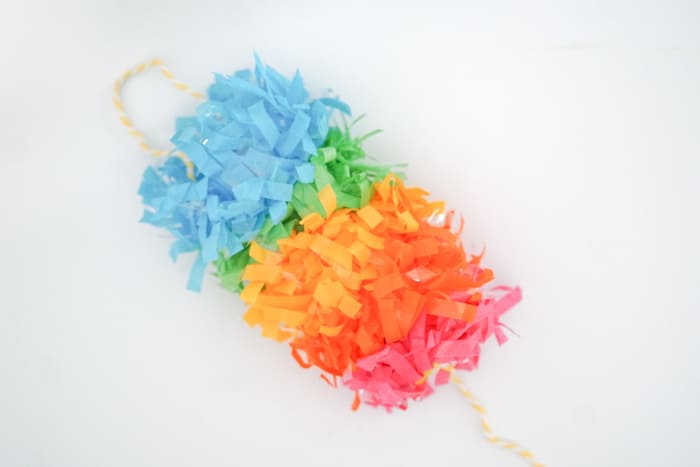
Continue up with the colors of the rainbow (red, orange, yellow, green, blue, and purple) to the top.
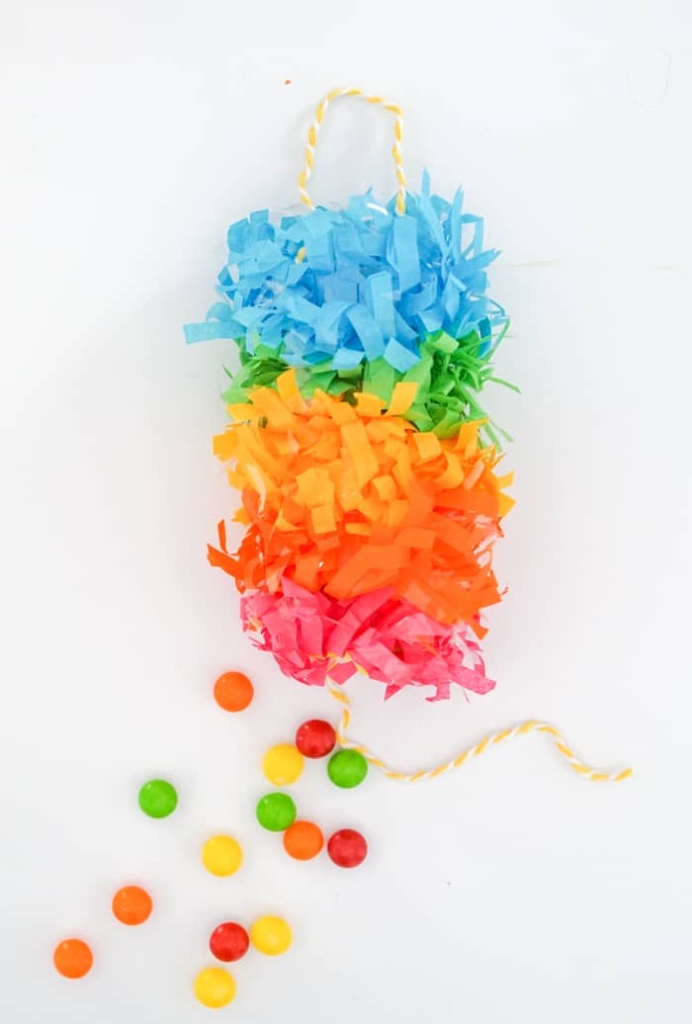
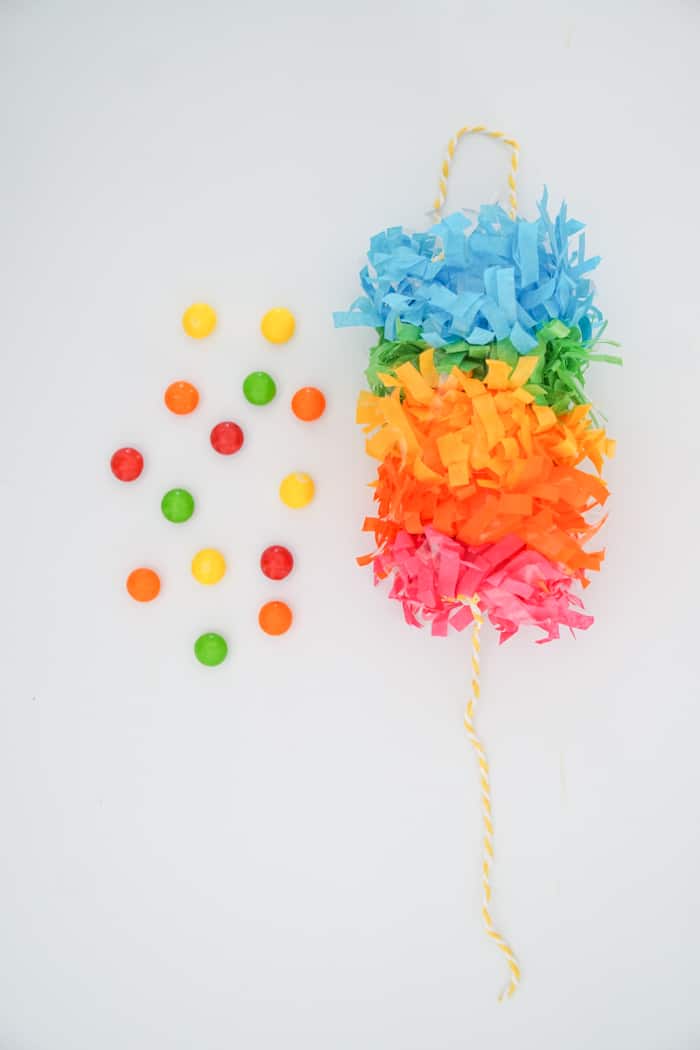
Add the goodies to your pinata
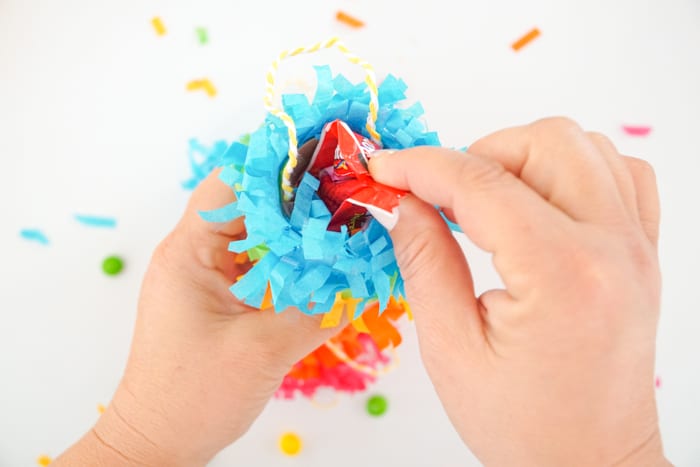
Lastly, you can add candy to the top of your pinata. If you are using this as a mini piñata party favor, then you might want to wait till the end to put out the candy and have them each pick their favorite bite-size candy and have them add it to the top of the tube as they are on the way out.
The best part is that you don't have to add hidden sweets to your mini pinatas. You can add small toys or smaller party favors that match the theme of the party too.
Party Ideas
We love a small help-yourself candy "bar" (spread of different candies in containers that they can add to their pinatas). If you put it out at the end of the party, then they can add a scoop or two of their favorites into their pinatas.
Added bonus, the sugar will be consumed not at your party 🙂 hahaha

Share Your Pinata
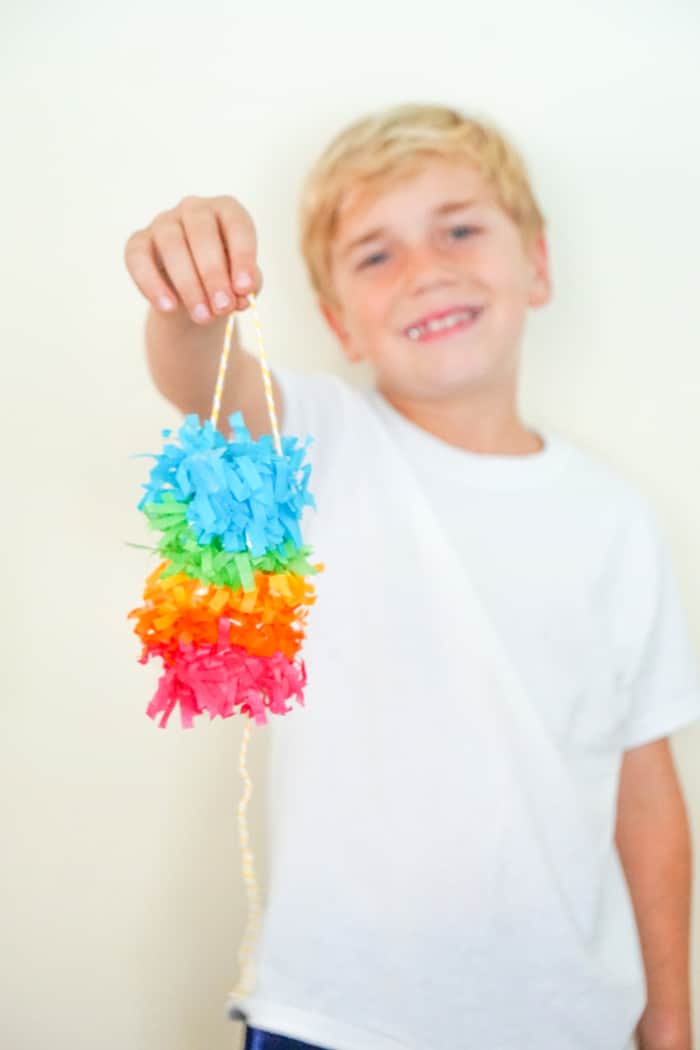
We sure hope you love these mini rainbow pinatas as much as we do. They are great for parties or to give as a gift.
We love how easy they are to put together and how great for kids to make and pretty much any age.
Let us know if you make them. We love it when friends make our crafts. Happy Crafting!
Do not miss our 1Crafts and Activities for Borked Kids for other fun crafts like this one!
You also do not want to miss our 101+ Fun Coloring Pages For Kids and 101+ Free Kids Printables full of Crafts & Coloring Pages.
Other Rainbow Crafts You'll Love
- Rainbow Painted Rocks
- How to Make a Rainbow Lazy Susan
- Macrame Rainbow
- Paint Sample Rainbow Craft
- Modern Popsicle Stick Shelf

Easy Mini Rainbow Pinata
Looking for a fun kids birthday party craft, then we have you covered with these super easy mini rainbow pinatas. They make a great party favor too!
Equipment
Ingredients
- Toilet paper rolls - if you do not save them you can buy a group of 30 craft rolls
- Festive festooning - each color sold separately. I love using it for lots of other kid's crafts and party supplies.
- Tissue Paper - one sheet is plenty for most group sizes.
- String or Ribbon
- Tape
Instructions
- Start with cutting the tissue paper into 3-inch squares. This is a great size for a standard toilet paper roll. The key is to make sure that it covers one of the ends.

- Cut the string or ribbon into 8-inch pieces. You can, of course, make these longer, but for sake of efficiency if you are making them for a class or party then I suggest making them all 8 inches. You will need two pieces per pinata.

- Place a small piece of tape on the end of one piece of the string.
- Tape the end of the string to the inside of the craft roll.
- Tape the other end to the other side of the inside of the roll. This creates the handle for the pinata. Note, if you are looking to add heavier items into your pinata like toys or heavier candy and want these to hang. I would punch a hole in the sides and tie the ends of the string in knots and then your mini pinata holds up to 2lb.
- Next, take your 3-inch tissue paper square and you are going to cut a small x in the middle. This will make when the kids to pull the string of the bottom to let the candy out easier. To cut an "x" you simply fold the square in half and make a small cut, then fold in half the other way and make another cut.
- That will give your tissue paper a small x in the middle of your square. If the kids are younger and you do not want them handling scissors, simply cut the x on the tissue papers before you place out the craft.
- Take one end of a piece of string and place it over the x of the tissue paper.
- Tape the end of the string to the x of the tissue paper. This will be the tail of your pinata.
- Place the tissue paper over the other end of the toilet paper roll. You will have the handle on one end and this is the tail end of the pinata. You will then tape the tissue paper around the outside of the craft roll.

- Now it's time to add the festooning to the pinata. You will start on the bottom of the pinata. What I love about the festooning is that the middle is a solid ribbon that is easy to tape. You can cut your festooning into 6-8 inch pieces depending on your craft roll.
- Tape the other end of the festooning. The fringe covers the tape and so you can not even see it.
- Continue up with the colors of the rainbow to the top.
- Lastly, you can add the candy to the top of your pinata. If you are using this as a party favor, then you might want to wait till the end to put out the candy and have them each pick their favorite bite-size candy and have them add it as they are on the way out.


Video
CONNECT WITH MADE WITH HAPPY!
Be sure to follow me on social media, so you never miss a post!
Facebook | Twitter | Youtube | Pinterest | Instagram
Find and shop my favorite products in my Amazon storefront here!
RAINBOW MINI PINATAS
PIN IT TO YOUR CRAFT BOARD ON PINTEREST!
FOLLOW MADEWITHHAPPY ON PINTEREST FOR ALL THINGS HAPPY!